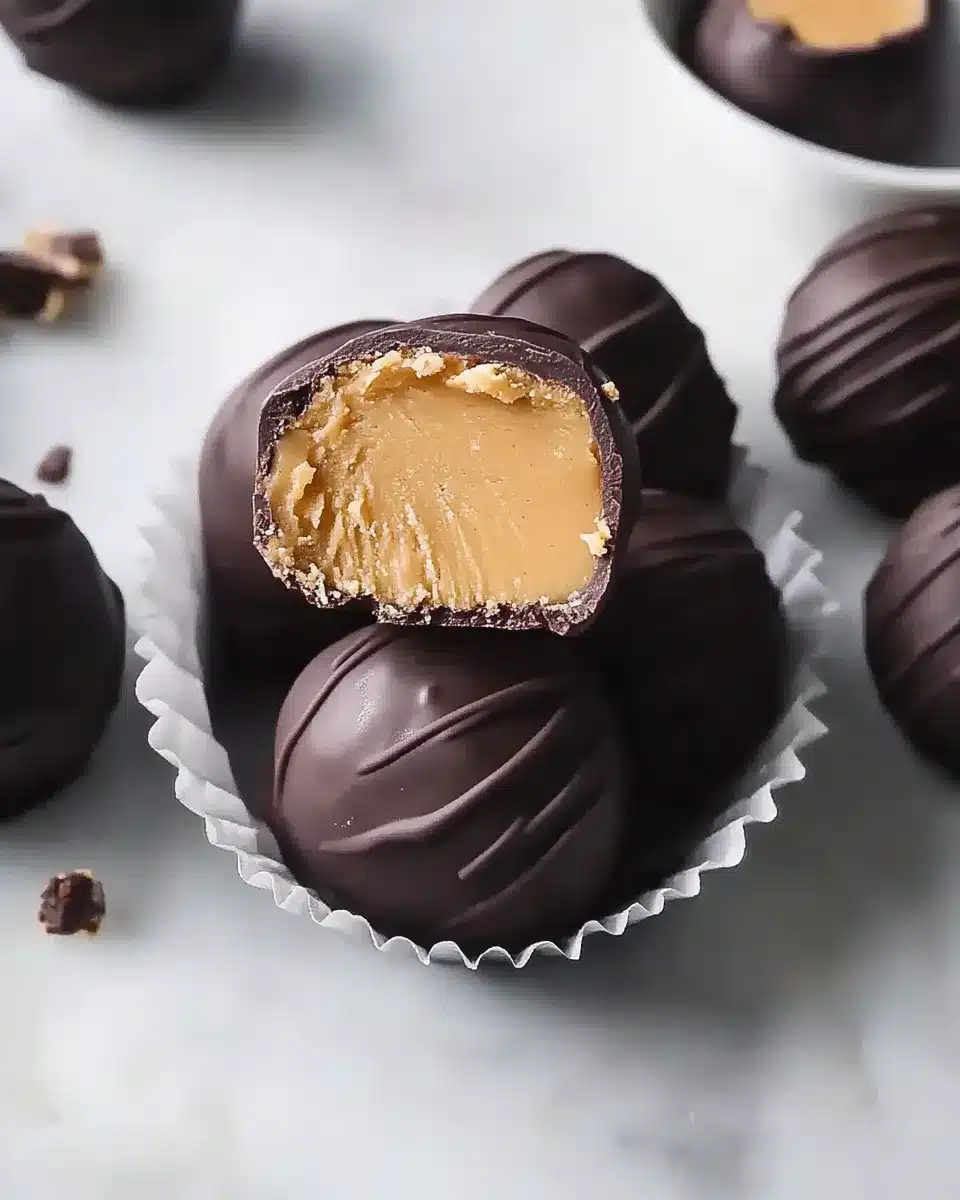
Peanut Butter Truffle: Irresistibly Delicious Treats
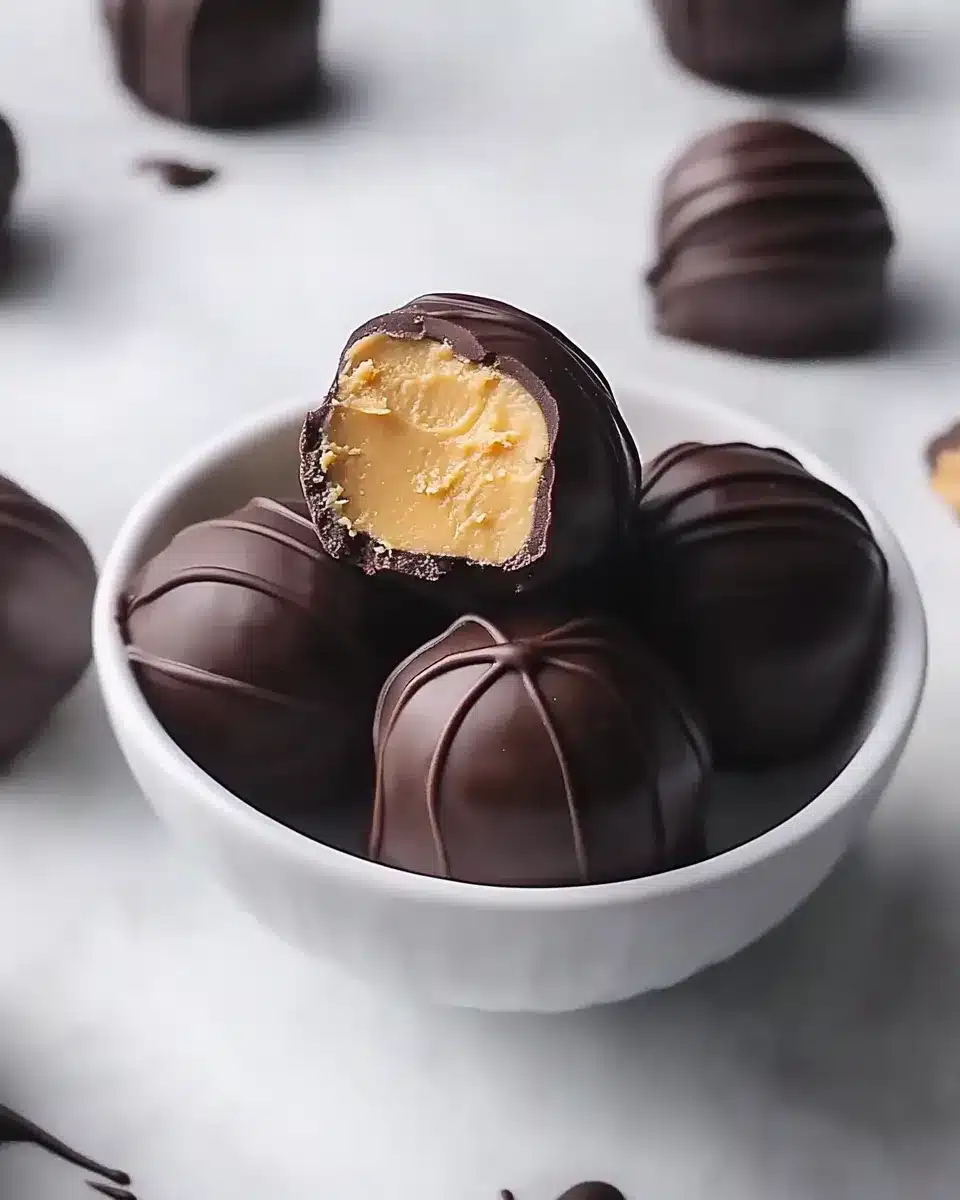
If you’re a fan of sweet treats that effortlessly combine rich flavor and delightful texture, then the allure of these heavenly bites is undeniable. Peanut butter truffles offer an indulgent experience that strikes the perfect balance between creamy and crunchy. With their velvety peanut butter center encased in a luscious chocolate shell, these treats are sure to satisfy your cravings.
What’s even better? The potential for creativity is endless! You can play around with different coatings, such as crushed nuts, sprinkles, or even a drizzle of white chocolate to elevate their visual appeal. Want to add a little spice? A pinch of sea salt or a hint of cinnamon could turn your truffles into an unforgettable delight.
For the best results, ensure your peanut butter is at room temperature before mixing and don’t skip the chilling phase – this helps achieve that perfect bite. Dive into this recipe, and discover how easy it is to craft your own little bites of bliss!
Ingredients for peanut butter truffle:
This delightful treat combines the rich flavor of peanut butter with a creamy texture, making it a perfect dessert for gatherings or family celebrations. With this list of ingredients, you can make enough truffles to serve 8 to 10 people, ensuring everyone gets a taste!
Base Ingredients
- 1 cup creamy peanut butter: Use a high-quality, natural peanut butter for the best flavor and texture.
- 1 cup powdered sugar: This will sweeten the mixture and help it hold together.
- 1/2 cup graham cracker crumbs: These add a delightful crunch and help create a stable base for your truffles.
- 1 teaspoon vanilla extract: Vanilla enhances the overall flavor, adding a hint of warmth that complements the peanut butter.
Coating Ingredients
- 8 oz semi-sweet chocolate: Chop into small pieces for easier melting. This will be the luscious coating for your truffles.
- 1 tablespoon coconut oil: Mixing a bit of coconut oil with the chocolate ensures a smooth and glossy finish. Alternatively, you can use vegetable shortening if you prefer.
Optional Flavor Variations
To customize your peanut butter truffles, consider the following variations:
- Crunchy Peanut Butter: Swap creamy peanut butter with crunchy for added texture and nutty flavor.
- Sea Salt: Sprinkle a pinch of flaky sea salt on top of the chocolate coating for an enticing sweet and salty contrast.
- Dark Chocolate: Use dark chocolate instead of semi-sweet for a richer flavor profile.
- Flavor Extracts: Introduce flavors such as almond extract or even orange zest to surprise your taste buds.
Equipment Needed
Gather the following equipment before starting:
- Mixing bowl: For combining all your main ingredients.
- Double boiler or microwave-safe bowl: For melting the chocolate smoothly.
- Baking sheet lined with parchment paper: To set your truffles once they are formed.
With these ingredients and options, you are well on your way to creating a delicious treat that everyone will love!
How to prepare peanut butter truffle:
Follow these simple steps to make a delightful peanut butter truffle that your friends and family will love.
Gather your ingredients
Start by collecting all the necessary ingredients for the truffles. You will need 1 cup of creamy peanut butter, 1 cup of powdered sugar, and 1 teaspoon of vanilla extract. You will also need chocolate for coating; semi-sweet or dark chocolate works best, about 8 ounces should suffice. Lastly, prepare some chopped nuts or sprinkles for decoration if desired.
Mix the peanut butter base
In a medium mixing bowl, combine the peanut butter and vanilla extract. Stir them together until the mixture is smooth and well combined. Make sure there are no lumps in your peanut butter. Then, gradually add the powdered sugar, mixing thoroughly after each addition. This step ensures a smooth and sweet truffle filling.
Form the truffles
Once the mixture is well combined, use your hands to roll small portions into balls, about 1 inch in diameter. Place the formed truffles on a baking sheet lined with parchment paper. Ensure there is enough space between each ball, as they might slightly expand during freezing.
Chill the truffles
Cover the baking sheet with plastic wrap and place it in the refrigerator. Chill the truffles for at least 30 minutes or until they are firm. This will make it easier to coat them in chocolate later.
Melt the chocolate coating
While the truffles chill, prepare the chocolate coating. Break the chocolate into small pieces and melt it using a double boiler or in short bursts in the microwave. If using a microwave, heat the chocolate in 30-second intervals, stirring in between until it is completely smooth.
Coat the truffles
Once the truffles are firm, remove them from the refrigerator. Dip each truffle into the melted chocolate using a fork. Gently shake off any excess chocolate and return them to the parchment-lined baking sheet. If desired, immediately sprinkle chopped nuts or decorations before the chocolate sets.
Let the chocolate set
Allow the coated truffles to sit at room temperature or place them in the refrigerator to speed up the setting process. Once the chocolate is completely hardened, your peanut butter truffles are ready to be enjoyed!
Tips for the Perfect Peanut Butter Truffle
Maintain the Correct Temperature
To achieve the ideal texture for your truffles, start by keeping your ingredients at the right temperature. Use room-temperature peanut butter for easier mixing. If you prefer a smoother texture, slightly warm the peanut butter in the microwave for just a few seconds. Be cautious not to overheat it, as this can change its consistency. After mixing, refrigerate the truffle mixture for about 30 minutes. This helps firm it up, making it easier to shape.
Use Quality Ingredients
The choice of ingredients significantly influences the flavor of your truffles. Use high-quality peanut butter with minimal additives. Natural varieties, with just peanuts and salt, offer a rich taste without artificial ingredients. Select dark chocolate with a cocoa content of at least 60% for coating the truffles. This balance of sweetness and bitterness enhances the overall flavor. Fresh ingredients lead to the best results, so avoid using outdated items.
Substitutions for Dietary Restrictions
If you or your guests have dietary restrictions, fear not! You can easily adapt your truffle recipe. For a vegan version, substitute honey with maple syrup or agave nectar. This keeps the sweetness intact while ensuring it fits within a plant-based diet. If nut allergies are a concern, replace peanut butter with sunflower seed butter or a seed blend. Both alternatives replicate the creamy texture effectively. For a gluten-free option, ensure all chocolate and other ingredients are certified gluten-free.
Texture Adjustments
If you desire a creamier truffle, consider adding a splash of coconut oil to the chocolate coating. This will not only improve the texture but can also add a subtle flavor. For crunch, mix in crushed nuts or rice cereal to the peanut butter base before chilling. This addition creates an exciting contrast in every bite.
h4>Mind Your Portion Sizes
Lastly, remember that these treats can be rich and indulgent. A small, bite-sized truffle often suffices to satisfy your sweet tooth. Use a cookie scoop for uniformity, ensuring even portions that make sharing easy and enjoyable for everyone.
Storage Tips for Peanut Butter Truffle:
When you indulge in peanut butter truffles, you want to keep them fresh for as long as possible. Proper storage enhances flavor and maintains texture. Follow these tips to enjoy your treats at their best.
Optimal Storage Conditions
Store your truffles in an airtight container. This prevents moisture and air from affecting their quality. Glass or plastic containers with tight-fitting lids work well. Place a sheet of parchment paper between layers if you stack them. This layer helps avoid sticking and preserves their shape.
Keep the container in a cool, dry place away from direct sunlight. Heat can cause the chocolate to melt and the peanut butter to lose its creamy texture. A pantry or cabinet works perfectly if you maintain a stable temperature.
Refrigeration and Freezing
If you plan to store truffles for an extended period, consider refrigerating them. The cooler temperature helps prolong their freshness. Wrap each truffle in plastic wrap or aluminum foil before placing them in the airtight container. This added layer prevents them from absorbing any odors from the fridge.
For even longer storage, freeze your peanut butter truffles. Place them in a freezer-safe bag or container after wrapping them individually. Ensure to remove as much air as possible to avoid freezer burn. They can last up to three months when frozen without losing flavor.
When you’re ready to enjoy them, take the truffles out of the freezer and let them thaw in the fridge for several hours. This gradual process helps maintain their consistency and prevents condensation.
Shelf Life Considerations
Homemade peanut butter truffles generally last up to one week at room temperature, around two weeks in the fridge, and three months in the freezer. Always check for any signs of spoilage, such as changes in color or an off smell, before consuming.
By following these storage tips, you can maintain the delightful taste and texture of your peanut butter truffles, ensuring each bite feels fresh and indulgent. Enjoy your sweet treats while keeping them in optimal condition!
Related Recipes That Complement Peanut Butter Truffles
If you love the rich, creamy taste of peanut butter truffles, you’ll find these recipes both delightful and easy to make. Each option shares delightful flavors or appealing textures that pair nicely with your truffle treat.
First up is the Chocolate Peanut Butter Cup. This classic dessert combines a crunchy chocolate shell with a soft peanut butter filling, echoing the flavors found in the truffle. The blend of sweet chocolate and savory peanut butter creates a taste sensation that can satisfy any sweet tooth. Making these cups is straightforward, and they provide a fun, snackable format that complements your truffles.
Next on the list is the Peanut Butter Cookie Dough Bites. These treats deliver a cookie dough flavor without the baking fuss. They are made from peanut butter, oats, and a touch of honey, making them a nutritious and satisfying snack. Their chewy texture and nutty flavor mirror those of peanut butter truffles, providing a cohesive dessert experience.
Finally, consider the Dark Chocolate Dipped Banana Bites. While they feature a different base, the richness of the dark chocolate enhances the sweet, creamy banana. The combination offers a refreshing take that pairs well with the truffly indulgence. These bites add a fruity contrast that lightens your dessert platter.
Each of these recipes not only complements the peanut butter truffle perfectly but also adds variety to your dessert options, ensuring a well-rounded treat experience. Enjoy crafting a sweet spread that marries these delightful flavors together!
Frequently Asked Questions:
What are peanut butter truffles made of?
Peanut butter truffles are typically composed of a creamy mixture of peanut butter, cream cheese, powdered sugar, and graham cracker crumbs. Some recipes may also include chocolate for a rich coating, while others might feature nuts or coconut to enhance flavor and texture. These delightful treats can be easily customized to fit various dietary preferences, such as using alternatives like almond butter or sugar substitutes.
How do you store peanut butter truffles?
To maintain the freshness of your peanut butter confectionery, store them in an airtight container. They can be kept in the refrigerator for up to a week, allowing the flavors to meld beautifully. If you plan to keep them for a longer period, consider freezing them; just be sure to separate each truffle with parchment paper to prevent sticking.
Can you make peanut butter truffles vegan?
Absolutely! To create a vegan version of these treats, substitute traditional ingredients with plant-based alternatives. Use creamy peanut butter, coconut cream or cashew cream instead of cream cheese, and maple syrup or agave nectar in place of powdered sugar. A dairy-free chocolate coating can complete your delicious vegan truffles.
Are peanut butter truffles gluten-free?
Yes, peanut butter truffles can easily be gluten-free. Simply replace graham cracker crumbs with gluten-free alternatives, such as almond flour or gluten-free cookie crumbs. Always check for gluten content in chocolate coating as well, opting for certified gluten-free brands when necessary.
How long do peanut butter truffles take to prepare?
Making these delectable treats is a quick process, usually taking around 30 minutes from start to finish, including chilling time. The actual mixing and rolling can be done in about 15 minutes, and then a brief chill in the refrigerator will help them set and develop richer flavors.
What variations can I try with peanut butter truffles?
There are countless variations you can experiment with! One popular option is to use dark chocolate instead of milk chocolate for a more intense flavor. You can also incorporate different mix-ins, like pretzels for added crunch, or swaps such as almond butter mixed with honey. The possibilities are endless, allowing you to personalize your truffles to suit your taste preferences.
Conclusion:
In conclusion, making a delicious peanut butter truffle is a simple yet rewarding experience. This recipe emphasizes the flexibility of using basic ingredients like peanut butter, chocolate, and optional toppings, allowing you to customize every bite to your liking. Whether you prefer crispy textures with crushed nuts or a rich finish with a sprinkle of sea salt, the possibilities are endless. Additionally, these indulgent bites are perfect for sharing at gatherings or enjoying as a personal treat. With minimal effort and a few simple steps, you can create delightful peanut butter truffles that cater to your taste preferences while impressing friends and family. So get creative in the kitchen, enjoy the process, and savor every moment of this delightful treat!