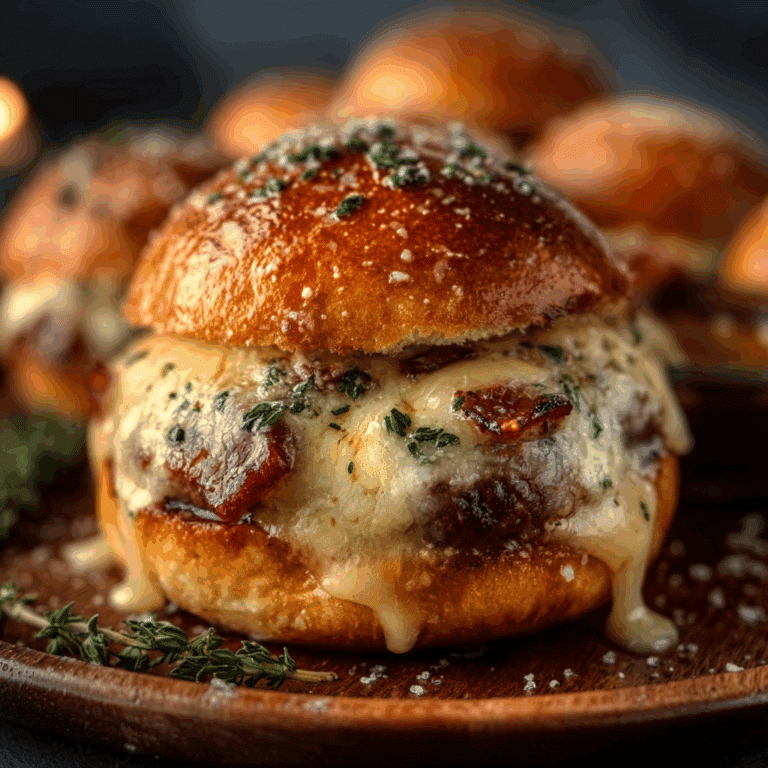
Cheeseburger Sliders: The Perfect Party Appetizer

Picture this: a warm, soft slider bun cradling a juicy beef patty, topped with melted cheese and your favorite fixings, all in a perfectly bite-sized form. Cheeseburger sliders are not just a crowd-pleaser; they offer endless possibilities for customization, making them an exciting addition to any gathering. Whether you’re hosting a game day party or a casual family dinner, these little delights bring both flavor and convenience to the table.
Feel free to get creative with variations by incorporating different types of cheeses, adding spicy jalapeños, or even swapping beef for ground turkey or a plant-based alternative. To elevate your sliders, consider toasting the buns with a hint of garlic butter or serving them with zesty dipping sauces. With a few expert tips, like allowing your patties to rest for those perfect juices and balancing flavors with fresh toppings, you can ensure your sliders are the star of the show. Let’s dive into this mouthwatering recipe that will have everyone coming back for seconds!
Ingredients for Cheeseburger Sliders:
These delightful little cheeseburger sliders are perfect for your next gathering and will satisfy both adults and kids alike. Below is a detailed list of ingredients you will need to serve 8 to 10 people. Prepare to tantalize your taste buds with this scrumptious bite-sized treat!
For the Slider Patties:
- 1 ½ pounds ground beef (preferably 80/20 for optimal flavor and juiciness)
- 1 teaspoon kosher salt
- ½ teaspoon black pepper
- 2 teaspoons Worcestershire sauce (for added depth of flavor)
- ½ teaspoon garlic powder
- ½ teaspoon onion powder
- 8 slices of your favorite cheese (cheddar, American, or Swiss work best)
For the Slider Buns:
- 1 package of slider buns (12 small buns, preferably potato buns for a touch of sweetness)
- 2 tablespoons unsalted butter (melted, for brushing on the buns)
- 1 teaspoon garlic powder (optional, to add a hint of garlic flavor)
Toppings and Condiments:
- 1 cup shredded lettuce (for a refreshing crunch)
- 1 medium tomato (sliced, adding juiciness and flavor)
- ½ red onion (sliced thinly, for a bit of sharpness)
- ½ cup pickles (sliced, for that classic burger taste)
- Ketchup (to taste)
- Mustard (to taste)
- Mayonnaise (optional, for creaminess)
Optional Flavor Variations:
To elevate your cheeseburger sliders, consider trying out some variations:
- BBQ Bacon Sliders: Add crispy bacon strips and barbecue sauce for a smoky twist.
- Mushroom Swiss Sliders: Sauté diced mushrooms and mix with Swiss cheese for a gourmet version.
- Spicy Jalapeño Sliders: Add sliced jalapeños and pepper jack cheese for some heat.
- Caprese Sliders: Swap beef patties for fresh mozzarella, tomatoes, and pesto for a lighter option.
With these ingredients at hand, you are set to prepare delicious cheeseburger sliders that everyone will enjoy!

How to prepare Cheeseburger Sliders:
Making delicious cheeseburger sliders is simple and rewarding. Follow these steps to create a crowd-pleasing appetizer or meal.
Step 1: Gather Your Ingredients
Collect all the necessary ingredients before starting. You will need:
- 1 pound ground beef
- 1 teaspoon garlic powder
- 1 teaspoon onion powder
- Salt and black pepper to taste
- 8 slider buns
- 8 slices of cheese (cheddar works well)
- Condiments (ketchup, mustard, pickles, etc.)
- Optional: lettuce and tomato for toppings
Step 2: Preheat Your Oven
Set your oven to 350°F (180°C). Preheating helps ensure even cooking.
Step 3: Prepare the Burger Mixture
In a mixing bowl, combine the ground beef, garlic powder, onion powder, salt, and pepper. Use your hands to mix gently until combined. Avoid overworking the meat.
Step 4: Shape the Patties
Divide the meat mixture into eight equal portions. Roll each portion into a small ball, then flatten it to form a slider patty about ½ inch thick.
Step 5: Cook the Patties
Heat a skillet over medium-high heat. Cook the patties for about 3-4 minutes on each side until they reach your desired doneness. You can add cheese slices on top for the last minute to melt.
Step 6: Toast the Slider Buns
While the patties are cooking, slice the slider buns in half. Place them cut-side up on a baking sheet. Toast them in the oven for about 5 minutes or until they are lightly golden.
Step 7: Assemble the Sliders
Remove the patties and buns from the heat. Place a patty on each bottom bun. Add your favorite condiments and toppings like lettuce, tomato, or pickles.
Step 8: Serve and Enjoy
Top each slider with the other half of the bun. Serve immediately, and watch them disappear!
Tips for the Perfect Cheeseburger Sliders
Maintain the Correct Cooking Temperature
To ensure juicy and flavorful sliders, cooking them at the right temperature is crucial. Preheat your grill or skillet to medium-high heat, which is around 375°F (190°C). This temperature allows the sliders to sear nicely, creating a crispy exterior while keeping the inside moist. Use a meat thermometer to check that the internal temperature reaches 160°F (71°C) for ground beef. Avoid cooking on too high a heat to prevent burning the outsides while leaving the insides raw.
Use Quality Ingredients
The success of your sliders heavily relies on the quality of the ingredients. Start with fresh, ground beef that contains a good fat content, ideally around 80/20. This ratio gives the meat enough fat to stay juicy during cooking. If you prefer leaner meats, consider ground turkey or chicken, but watch the cooking time as they can dry out easily. Also, opt for fresh slider buns that are soft and slightly toasted. Adding fresh toppings like lettuce, tomato, and pickles enhances the flavor and texture of your sliders.
Suitable Substitutions for Dietary Restrictions
Dietary restrictions should not limit your slider-making experience. For those avoiding beef, try plant-based crumbles or black bean patties as alternatives. For gluten-free options, use gluten-free buns or lettuce wraps. If dairy is a concern, look for vegan cheese or skip the cheese altogether. Adjust toppings based on preferences or allergies—for instance, avocado slices can add creaminess in place of cheese.
Add Flavor with Seasonings and Toppings
Elevate your cheeseburger sliders by incorporating various seasonings and toppings. Mix garlic powder, onion powder, salt, and pepper into the meat before forming patties. For an extra kick, add Worcestershire sauce or even BBQ sauce to the meat mixture. Top with your favorites like sautéed onions, jalapeños, or different cheese varieties. A generous dollop of your choice of sauce—be it ketchup, mayo, or a specialty sauce—can amplify the taste and make each bite unforgettable.
Incorporating these tips will lead to a delightful slider experience. Enjoy crafting and customizing your sliders to suit any gathering or meal.
Storage Tips for Cheeseburger Sliders:
Proper storage of cheeseburger sliders ensures you maintain their freshness and taste. Follow these practical tips to keep your sliders delicious and safe to eat.
Maintaining Freshness
To maintain freshness, store your sliders in an airtight container. This prevents air from entering and causing them to dry out. If you’ve assembled your sliders, wrap them tightly in plastic wrap or aluminum foil before placing them in a container. This extra layer of protection helps keep them moist.
Optimal Storage Conditions
Keep your cheeseburger sliders in the refrigerator if you plan to consume them within three days. Set your fridge temperature to 35°F to 38°F (1.6°C to 3.3°C) for optimal preservation. For longer storage, consider freezing them. Place assembled sliders on a baking sheet and freeze until firm, then transfer them to a freezer bag. Press out as much air as possible before sealing.
Shelf Life of Sliders
When stored in the refrigerator, sliders last for about 3 days. For the best taste and texture, consume them within this timeframe. In the freezer, they can last up to 3 months. However, for the best quality, aim to use them within 1 to 2 months. Label your containers with the date for easy tracking.
Reheating Tips
When ready to enjoy your sliders again, reheating them properly can revive their flavor. For refrigerated sliders, simply place them in the microwave for 30 seconds to 1 minute, or until warmed through. If you froze them, thaw them in the refrigerator overnight before reheating. You can also reheat them in the oven at 350°F for about 10 minutes to get a crispy texture.
By following these storage tips, you can ensure your cheeseburger sliders stay fresh and tasty, making your meal prep both efficient and enjoyable.
Related Recipes to Enjoy with Cheeseburger Sliders
If you love cheeseburger sliders, you might also enjoy these delicious recipes that pair wonderfully with them or offer a similar flavor profile.
-
Buffalo Chicken Sliders:
These sliders bring a spicy twist to your table. Featuring shredded chicken tossed in buffalo sauce, they have a rich flavor that complements the savory taste of cheeseburger sliders. Serve with a side of ranch or blue cheese dressing for an extra kick. -
BBQ Pulled Pork Sliders:
Tender pulled pork drenched in tangy barbecue sauce will satisfy any meat lover. The smoky flavors and soft buns make them a great alternative to cheeseburger sliders. They also pair well with coleslaw, making for a complete meal. -
Caprese Sliders:
For a lighter and fresh option, caprese sliders feature fresh mozzarella, tomatoes, and basil drizzled with balsamic glaze. They add a refreshing balance to the heartiness of cheeseburger sliders and can be enjoyed by those looking for a vegetarian option. -
Meatball Sliders:
These sliders offer a delightful Italian twist. Juicy meatballs served in marinara sauce and topped with melted cheese create a mouthwatering combination. The rich, savory flavors of meatball sliders make them a satisfying counterpart to cheeseburger sliders.
These recipes not only share the slider concept but also enhance a gathering, allowing for a tasty variety. They are sure to impress your guests and keep everyone happy!
Frequently Asked Questions:
What are the best buns for mini cheeseburgers?
Choosing buns for your mini cheeseburgers significantly affects the overall taste. The ideal buns should be soft yet sturdy enough to hold the filling without falling apart. Slider buns, mini brioche, or dinner rolls are popular choices due to their fluffy texture and versatility. Toasting them lightly can also enhance the flavor and add a delightful crunch.
How can I make cheeseburger sliders healthier?
To create healthier versions of cheeseburger sliders, consider using lean ground beef or turkey instead of higher-fat meats. You can also incorporate whole grain buns and load them with fresh toppings like tomatoes, lettuce, or sliced avocado. Opting for low-fat cheese or plant-based cheeses can lower the calorie count without sacrificing flavor.
What are some creative toppings for slider burgers?
While classic toppings include cheese, ketchup, and pickles, you can elevate your mini burgers by experimenting with various toppings. Options like caramelized onions, sautéed mushrooms, jalapeños, or barbecue sauce can add depth and excitement. Additionally, for an international twist, try incorporating elements like kimchi, sriracha mayo, or guacamole.
Can I prepare cheeseburger sliders in advance?
Absolutely! Preparing cheeseburger sliders ahead of time is a great way to save time. You can form the patties and store them in the refrigerator for up to a day before cooking. Baking the sliders in the oven rather than grilling allows for easy batch cooking and reheating. Just assemble the sliders when you’re ready to serve.
What side dishes pair well with mini cheeseburgers?
Pairing mini cheeseburgers with side dishes enhances your meal experience. Classic choices include crispy French fries, onion rings, or coleslaw. For a healthier combination, consider a fresh green salad or a vegetable platter with dips. These sides can complement the juicy sliders and provide a balanced meal.
How long should I cook cheeseburger sliders?
Cooking time for mini cheeseburgers typically ranges from 10 to 15 minutes, depending on the thickness of the patties and the cooking method. If grilling, use medium-high heat and cook for approximately 2-3 minutes per side for medium-rare. Always ensure the internal temperature reaches 160°F for safety before serving.
Conclusion:
Cheeseburger sliders are the ultimate choice for a quick and satisfying meal that doesn’t skimp on flavor. This recipe showcases the simplicity of preparing sliders, allowing even novice cooks to shine in the kitchen. One of the standout features is the flexibility it offers; you can easily adjust the ingredients to cater to personal preferences or dietary needs. Try adding different cheeses, toppings, or sauces to create variations that keep your taste buds intrigued. Additionally, they are perfect for gatherings, as these bite-sized delights are easy to share and customize per guest. Remember, the key to these scrumptious sliders lies in their adaptability; so feel free to experiment and make them your own. Enjoy the delightful process of creating cheeseburger sliders that will please everyone at your table!