Peach Cobbler Cheesecake Cones
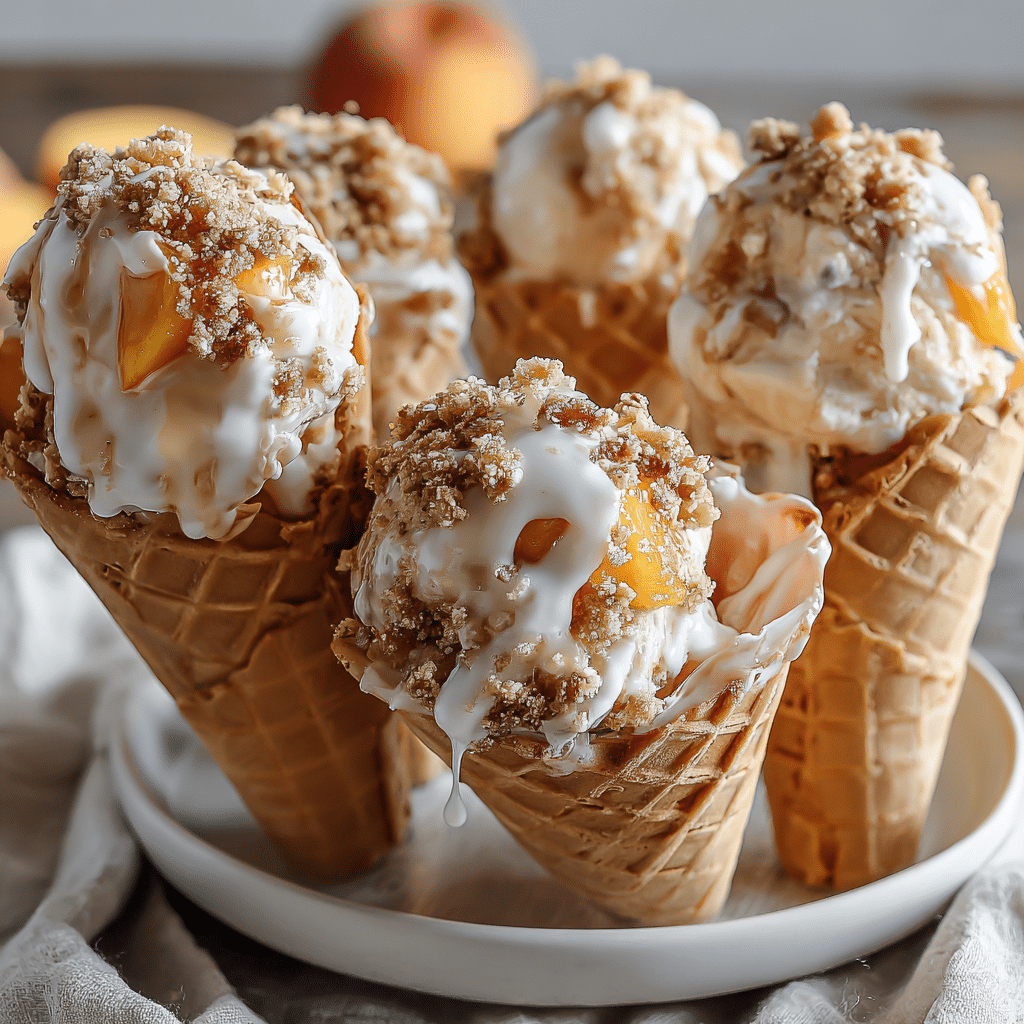
Delight in creamy Peach Cobbler Cheesecake Cones, combining fruity sweetness and rich cheesecake in a perfect handheld dessert. This delicious treat marries the warm, spiced flavors of peach cobbler with the smooth, tangy texture of cheesecake, all tucked neatly inside a crunchy cone for effortless enjoyment. Whether you’re serving at a family gathering or simply treating yourself, these cones offer a mouthwatering blend that’s both nostalgic and refreshing.
Why You’ll Love This Recipe
- Handheld convenience: Enjoy dessert anywhere without the need for plates or forks, making them perfect for parties and picnics.
- Perfect flavor combo: The sweet peaches combined with creamy cheesecake create a harmonious, irresistible dessert.
- Easy to customize: You can tweak the spices, toppings, or crust for your preferred sweet twist.
- Quick to assemble: No long baking times required, so you can satisfy sweet cravings swiftly.
- Impressively unique: A creative dessert that stands out among usual options.
Ingredients You’ll Need
Each ingredient is both simple and essential, with every component playing a role in crafting the perfect balance of taste, texture, and color in your Peach Cobbler Cheesecake Cones.
- Fresh peaches: Choose ripe, juicy peaches for natural sweetness and vibrant flavor.
- Cream cheese: Provides the creamy, smooth base that defines the cheesecake element.
- Vanilla extract: Enhances overall aroma and warmth.
- Brown sugar: Adds depth and caramel-like sweetness to the peach topping.
- Cinnamon and nutmeg: Brings the classic spice notes characteristic of peach cobbler.
- Waffle cones: Crisp and sturdy enough to hold the filling without sogginess.
- Whipped cream: Lightens the cheesecake filling for a fluffy texture.
- Lemon juice: Balances sweetness with a subtle tang and helps keep peaches fresh.
- Butter: For sautéing peaches to bring out their natural flavors.
Variations for Peach Cobbler Cheesecake Cones
The beauty of Peach Cobbler Cheesecake Cones is how easily they can be personalized. Whether you want to accommodate dietary choices or experiment with new flavors, a few tweaks can take this dessert to exciting places.
- Dairy-free option: Use vegan cream cheese and whipped coconut cream to keep it creamy but allergen-friendly.
- Mixed fruit twist: Substitute or add berries, such as blueberries or raspberries, for a fresh berry cobbler blend.
- Spiced up: Increase cinnamon and add ground cloves for a spicier, cozy flavor profile.
- Crunchy topping: Sprinkle chopped pecans or almonds on top for extra texture and nuttiness.
- Gluten-free cones: Use gluten-free waffle cones to make this treat accessible for gluten-sensitive friends.

How to Make Peach Cobbler Cheesecake Cones
Step 1: Prepare the Peach Filling
Start by peeling and slicing fresh peaches. Heat butter in a skillet over medium heat, then add peaches, brown sugar, cinnamon, nutmeg, and a splash of lemon juice. Cook for about 5-7 minutes until the peaches soften and the mixture thickens slightly. Allow it to cool before assembly.
Step 2: Make the Cheesecake Filling
In a mixing bowl, beat softened cream cheese until smooth. Gently fold in whipped cream and vanilla extract for that luscious cheesecake texture and flavor. Keep chilled until ready to fill cones.
Step 3: Assemble the Cones
Carefully fill waffle cones with a layer of cheesecake mixture, then spoon in the peach filling, alternating layers if desired for visual appeal and flavor balance. Top with a small dollop of whipped cream or a sprinkle of cinnamon.
Step 4: Chill Before Serving
Place the filled cones upright in a container and refrigerate for at least 30 minutes to let the flavors meld and the cones remain crisp.
Pro Tips for Making Peach Cobbler Cheesecake Cones
- Use ripe peaches: The flavor is best when peaches are naturally sweet and fragrant.
- Don’t overfill cones: Leave some space to avoid spills and for easier eating.
- Chill the cones first: Keep cones in the fridge before assembly to maintain crunchiness longer.
- Fresh whipped cream is key: Use freshly whipped cream rather than canned for superior taste and texture.
- Store upright: Use a cone holder or carton to keep cones standing during chilling and serving.
How to Serve Peach Cobbler Cheesecake Cones
Garnishes
Add fresh mint leaves, a dusting of powdered sugar, or a drizzle of caramel sauce for an elegant touch that complements the warm peach and creamy cheesecake.
Side Dishes
Serve with a scoop of vanilla ice cream, or alongside a refreshing summer salad to balance the indulgence of the cones with something light and crisp.
Creative Ways to Present
Place cones in floral holders or arrange on a beautiful wooden board lined with parchment paper for a rustic vibe. You can also wrap the cones individually in parchment and tie with colorful strings for a charming party favor look.
Make Ahead and Storage
Storing Leftovers
Cover assembled cones loosely with plastic wrap and store in the refrigerator. Consume within 1–2 days for the best freshness and cone crunch.
Freezing
While it’s possible to freeze the cheesecake filling and peach topping separately, avoid freezing the assembled cones as the texture of the cones may become soggy upon thawing.
Reheating
This dessert is best served chilled, so no reheating is recommended. Instead, let refrigerated cones sit at room temperature for 10 minutes before serving to soften slightly.
FAQs
Can I use canned peaches instead of fresh?
Yes, canned peaches work well, but opt for those packed in juice, not syrup, and drain excess liquid to avoid soggy cones.
How long do Peach Cobbler Cheesecake Cones keep fresh?
They are best enjoyed within 1–2 days when refrigerated to maintain creamy texture and cone crunch.
Can I prepare these cones vegan?
Absolutely! Use dairy-free cream cheese and coconut whipped cream, plus vegan-friendly cones for a delicious vegan version.
Is this dessert suitable for kids?
The mild sweetness and creamy texture make it a big hit with kids, plus the fun cone format makes it easy for little hands.
Can I make these cones ahead for a party?
You can prepare the fillings a day in advance and assemble cones a few hours before serving, storing them chilled upright to keep them fresh.
Final Thoughts
If you’re looking to impress with something both nostalgic and refreshingly new, give these Peach Cobbler Cheesecake Cones a try. Their delightful combination of creamy, fruity, and crunchy elements will surely become one of your favorite go-to desserts. Whip up a batch and treat yourself — you deserve this sweet little indulgence!
Related Posts
Print
Peach Cobbler Cheesecake Cones
- Total Time: 22 minutes
- Yield: 6 cones 1x
- Diet: Gluten Free (if gluten-free cones used)
Description
Delight in creamy Peach Cobbler Cheesecake Cones, a handheld dessert combining the warm, spiced flavors of peach cobbler with smooth, tangy cheesecake, all inside a crunchy waffle cone. Perfect for parties, picnics, or a sweet treat, these cones are easy to assemble, customizable, and deliver a nostalgic yet refreshing taste experience.
Ingredients
Peach Filling
- 3 ripe fresh peaches, peeled and sliced
- 2 tablespoons butter
- 3 tablespoons brown sugar
- 1/2 teaspoon cinnamon
- 1/4 teaspoon nutmeg
- 1 teaspoon lemon juice
Cheesecake Filling
- 8 oz cream cheese, softened
- 1/2 cup whipped cream
- 1 teaspoon vanilla extract
Additional Ingredients
- 6 waffle cones
- Whipped cream, for topping
Instructions
- Prepare the Peach Filling: Peel and slice fresh peaches. Heat butter in a skillet over medium heat, add peaches, brown sugar, cinnamon, nutmeg, and lemon juice. Cook for 5-7 minutes until peaches soften and mixture slightly thickens. Cool before using.
- Make the Cheesecake Filling: In a mixing bowl, beat softened cream cheese until smooth. Gently fold in whipped cream and vanilla extract until combined. Chill until ready to fill cones.
- Assemble the Cones: Fill each waffle cone first with a layer of cheesecake mixture, then spoon in peach filling. Alternate layers if desired for appearance and flavor balance. Top with a small dollop of whipped cream or a sprinkle of cinnamon.
- Chill Before Serving: Place filled cones upright in a container. Refrigerate for at least 30 minutes to meld flavors and keep cones crisp.
Notes
- Use ripe peaches for best natural sweetness and aroma.
- Don’t overfill cones to avoid spills and ease eating.
- Chill waffle cones before assembly to maintain crunch.
- Use freshly whipped cream for superior taste and texture.
- Store assembled cones upright in the refrigerator to keep them crisp and fresh.
- Prep Time: 15 minutes
- Cook Time: 7 minutes
- Category: Dessert
- Method: No-Bake
- Cuisine: American
Nutrition
- Serving Size: 1 cone
- Calories: 280
- Sugar: 18g
- Sodium: 120mg
- Fat: 18g
- Saturated Fat: 10g
- Unsaturated Fat: 6g
- Trans Fat: 0g
- Carbohydrates: 22g
- Fiber: 2g
- Protein: 4g
- Cholesterol: 50mg
Keywords: peach cobbler, cheesecake, handheld dessert, waffle cone dessert, no-bake cheesecake, summer dessert, picnic dessert, quick dessert