Description
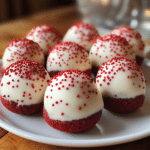
These Red Velvet Cake Balls are moist, rich, and bursting with classic red velvet flavor. Each bite-sized treat is coated in smooth cream cheese frosting or white chocolate, making them perfect for parties, gifts, or personal indulgence. Easy to make with simple ingredients, they offer a velvety texture and irresistible sweetness that will impress any crowd.
Ingredients
Scale
For the Cake Balls
- 1 box Red Velvet Cake Mix (prepared according to package instructions)
- Red Food Coloring (optional, to enhance color)
- 1 teaspoon Vanilla Extract
For the Frosting and Coating
- 1 cup Cream Cheese Frosting
- White Chocolate or Candy Melts (enough to coat all cake balls, about 12 oz)
Optional Decorations
- Sprinkles
- Crushed Nuts (pecans or walnuts)
- Edible Glitter
- Colored Candy Melts
Instructions
- Bake the Red Velvet Cake: Prepare the red velvet cake mix according to the package instructions or your favorite homemade recipe. Bake it evenly in a rectangular pan for easy slicing and crumbs. Allow the cake to cool completely before proceeding.
- Crumble the Cake: Using your hands or a fork, crumble the cooled cake into fine crumbs inside a large mixing bowl. Ensure that there are no large chunks to achieve a smooth texture for forming the cake balls.
- Mix with Cream Cheese Frosting: Gradually add cream cheese frosting to the cake crumbs, mixing well until the texture is moist enough to hold shape but not too sticky. This balance helps in rolling uniform spheres easily.
- Shape the Balls: Using a small cookie scoop or spoon, portion the mixture and gently roll it between your palms to form consistent, round balls. Place the formed cake balls on a parchment-lined baking sheet.
- Chill the Cake Balls: Refrigerate the cake balls for at least 30 minutes to firm up. This step makes them easier to dip and handle during coating.
- Dip and Decorate: Melt the white chocolate or candy melts in a bowl until smooth. Dip each chilled cake ball completely into the melted coating, allowing any excess to drip off. Place the dipped balls back on parchment paper and add any desired decorations such as sprinkles or edible glitter before the coating hardens.
- Set and Serve: Let the coating fully set at room temperature or in the refrigerator. Once set, serve your delicious Red Velvet Cake Balls or package them as gifts.
Notes
- Use a slightly underbaked red velvet cake to maintain optimum moisture for soft cake balls.
- Add cream cheese frosting gradually to avoid overly sticky or greasy texture.
- Chill the cake balls both before and after dipping to prevent cracking and ensure smooth coating.
- If the chocolate coating thickens, gently warm it again to facilitate easier dipping.
- Choose high-quality cream cheese and chocolate for richer flavor and better texture.
- Prep Time: 20 minutes
- Cook Time: 30 minutes
- Category: Appetizers
- Method: Baking
- Cuisine: American
Nutrition
- Serving Size: 1 cake ball
- Calories: 150
- Sugar: 18g
- Sodium: 120mg
- Fat: 7g
- Saturated Fat: 4g
- Unsaturated Fat: 2g
- Trans Fat: 0g
- Carbohydrates: 22g
- Fiber: 1g
- Protein: 2g
- Cholesterol: 15mg
Keywords: red velvet cake balls, cake pops, party treats, cream cheese frosting, dessert bites, homemade red velvet, gluten free dessert
