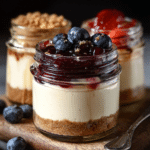
High-Protein Cheesecake Jars
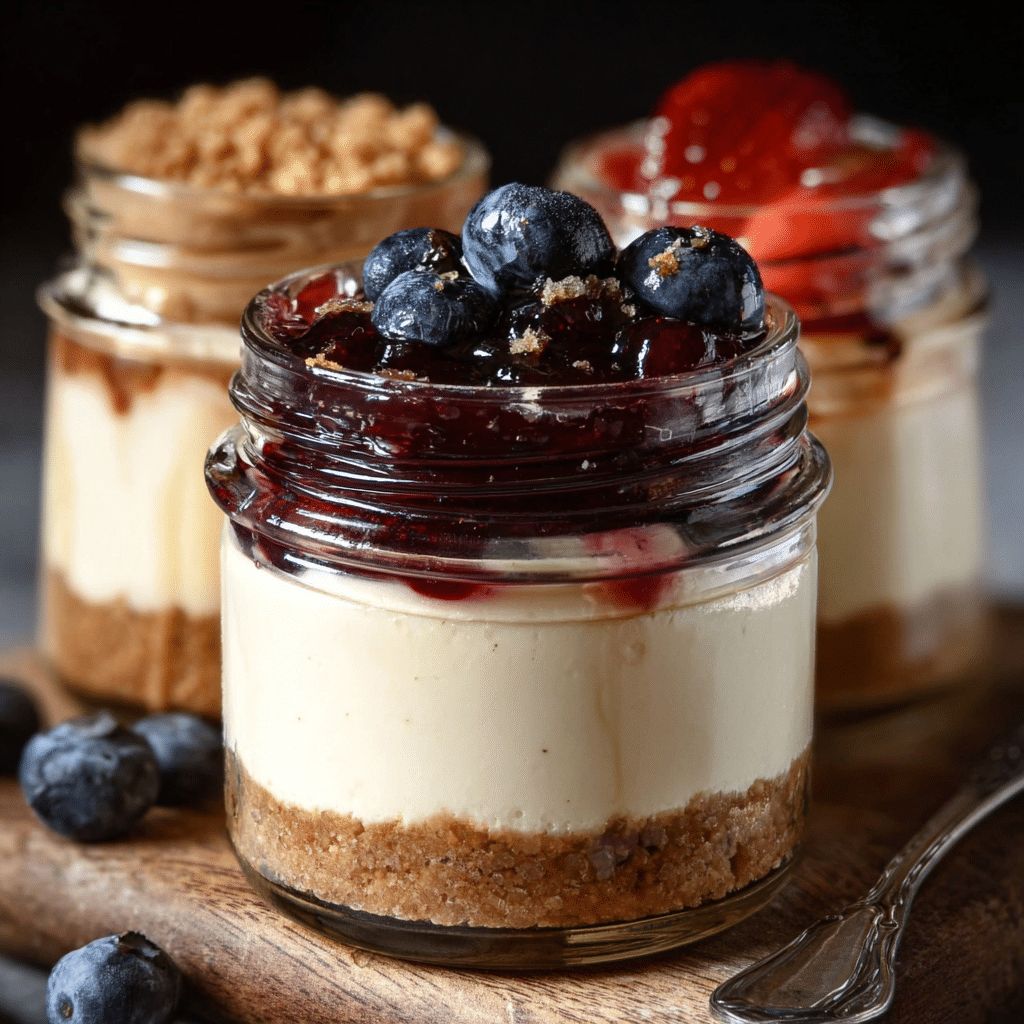
If you’re looking for a snack that’s both indulgent and nourishing, these High-Protein Cheesecake Jars are your new best friend. Creamy, satisfying, and packed with protein, they make the perfect quick treat that fuels your day with both flavor and nutrition. Whether you’re on the go, need a mid-afternoon pick-me-up, or just want a sweet-and-healthy delight, these jars hit the spot every time.
Why You’ll Love This Recipe
- Deliciously Creamy: Enjoy a smooth and rich cheesecake texture that feels like a treat without the guilt.
- Protein-Packed: Each jar is loaded with protein to keep you energized and full longer.
- Easy & Quick: Simple ingredients and fast prep make this snack perfect for busy days.
- Portable Convenience: Ready to grab and go, perfect for work, school, or travel.
- Customizable Flavor: Easily switch up toppings, fruits, or mix-ins to make it your own.
Ingredients You’ll Need
These ingredients are straightforward but essential, striking the right balance between creamy texture, rich taste, and wholesome nutrition for your High-Protein Cheesecake Jars.
- Cream Cheese: Provides the classic tang and smooth base texture.
- Greek Yogurt: Adds creaminess while boosting protein content.
- Protein Powder: Choose your favorite flavor to enhance the protein kick and add subtle sweetness.
- Honey or Maple Syrup: Natural sweetener for a gentle touch of sweetness.
- Vanilla Extract: Elevates the aroma and flavor complexity.
- Crushed Graham Crackers or Nuts: Adds a delightful crunchy base layer.
- Fresh Berries (optional): Brighten the flavor and add natural antioxidants and color.
Variations for High-Protein Cheesecake Jars
Feel free to personalize your High-Protein Cheesecake Jars to suit your taste buds or nutritional goals. It’s easy and fun to tweak the ingredients depending on what you have on hand or prefer.
- Chocolate Lover’s: Add cocoa powder or use chocolate-flavored protein powder for a decadent twist.
- Nutty Crunch: Swap the graham crackers for crushed almonds, walnuts, or granola for extra texture.
- Vegan Version: Use dairy-free cream cheese and plant-based protein powder to keep it dairy-free and vegan-friendly.
- Fruit Infusion: Layer in mango, peaches, or pomegranate seeds instead of berries for unique flavor bursts.
- Spiced Delight: Sprinkle cinnamon, nutmeg, or a pinch of cardamom for warm, aromatic highlights.

How to Make High-Protein Cheesecake Jars
Step 1: Prepare the Base Layer
Start by crushing your graham crackers or nuts finely, then evenly distribute a few spoonfuls at the bottom of each jar to create a crunchy foundation.
Step 2: Mix the Creamy Cheesecake Filling
In a mixing bowl, combine softened cream cheese, Greek yogurt, protein powder, honey or maple syrup, and vanilla extract. Whisk until smooth and well blended, ensuring there are no lumps.
Step 3: Assemble the Jars
Layer the cheesecake mixture over the base until the jar is about three-quarters full. For added texture, you can add a thin layer of fresh berries or fruit between the crust and the cheesecake layer.
Step 4: Chill and Set
Seal the jars and refrigerate for at least two hours to let the flavors meld and the filling firm up to a creamy yet stable consistency.
Step 5: Add Final Touches
Before enjoying, add a few fresh berries, nuts, or a drizzle of honey on top for an extra burst of flavor and visual appeal.
Pro Tips for Making High-Protein Cheesecake Jars
- Room Temperature Ingredients: Let your cream cheese and yogurt sit out before mixing to avoid lumps and ensure smooth blending.
- Choose the Right Protein Powder: Opt for unflavored or mildly flavored powders to not overpower the delicate cheesecake notes.
- Don’t Over-Sweeten: Remember, the base and toppings add flavor, so start with less sweetener and adjust as needed.
- Chill Time Matters: Refrigerate for at least two hours to allow the jars to firm and the flavors to harmonize fully.
- Layer Creatively: Try alternating layers of cheesecake and fruit for a beautiful visual and textural experience.
How to Serve High-Protein Cheesecake Jars
Garnishes
Top your jars with fresh berries, chopped nuts, a sprinkle of cinnamon, or a light drizzle of honey or dark chocolate for an inviting and flavorful finishing touch.
Side Dishes
Pair these jars with a side of fresh fruit salad or a handful of crunchy veggie sticks to complement the creamy texture and add some refreshing contrast.
Creative Ways to Present
Serve the cheesecake jars layered in clear glass containers to show off the beautiful textures and colors, or use mini mason jars for portion control and an adorable presentation perfect for parties or meal prep.
Make Ahead and Storage
Storing Leftovers
Keep your High-Protein Cheesecake Jars covered in the fridge for up to 3 days to maintain freshness and prevent drying out.
Freezing
You can freeze the jars for up to one month. Thaw them overnight in the fridge before enjoying to preserve texture and flavor.
Reheating
Since this is a cold dessert, we recommend eating it chilled. If you prefer warmer snacks, let it sit at room temperature for 10-15 minutes before digging in.
FAQs
Can I use other types of protein powder?
Absolutely! Whey, plant-based, or collagen protein powders all work well. Just choose a flavor that compliments the cheesecake, like vanilla or unflavored.
Is this recipe suitable for people with lactose intolerance?
You can make dairy-free versions by opting for lactose-free cream cheese, dairy-free yogurt, and plant-based protein powders.
How many servings does this recipe make?
This recipe typically makes 4-6 individual jars, perfect for snacks or light desserts throughout the week.
Can I prepare these jars in advance for meal prep?
Yes, High-Protein Cheesecake Jars are excellent for meal prepping as they keep well in the fridge and provide a quick protein boost.
What’s the best way to get a creamy texture without graininess?
Make sure your cream cheese is fully softened, and mix slowly; also, using a fine-mesh sieve after blending can remove any lumps for extra smoothness.
Final Thoughts
There’s something truly special about having a snack that’s both delicious and nourishing, and these High-Protein Cheesecake Jars deliver exactly that. Whether you’re craving something sweet after a workout or need a quick bite during the day, these jars bring together creamy indulgence and wholesome protein in a way that’s hard to beat. Give this recipe a try, customize it your way, and enjoy a new favorite snack that truly fuels your day.
Related Posts
- Stuffed Biscoff Butter Lava Cookies
- Strawberry Cheesecake Protein Balls
- White Chocolate Strawberry Mousse Domes
High-Protein Cheesecake Jars
- Total Time: 2 hours 15 minutes
- Yield: 4-6 jars
- Diet: Gluten Free
Description
These High-Protein Cheesecake Jars are a creamy, delicious, and nutritious snack packed with protein to keep you energized. Perfect for on-the-go, they combine a smooth cheesecake texture with wholesome ingredients for a quick, portable treat that supports your dietary goals with customizable flavors and toppings.
Ingredients
Base Layer
- Crushed Graham Crackers or Nuts – 1 cup
Cheesecake Filling
- Cream Cheese – 8 oz (softened)
- Greek Yogurt – 1 cup
- Protein Powder (vanilla or unflavored) – 1/2 cup
- Honey or Maple Syrup – 2 tablespoons
- Vanilla Extract – 1 teaspoon
Optional Toppings
- Fresh Berries (e.g., strawberries, blueberries, raspberries) – 1/2 cup
- Chopped Nuts – 2 tablespoons
- Drizzle of Honey or Maple Syrup – as desired
- Spices like Cinnamon, Nutmeg, or Cardamom – a pinch
Instructions
- Prepare the Base Layer: Start by crushing your graham crackers or nuts finely, then evenly distribute a few spoonfuls at the bottom of each jar to create a crunchy foundation.
- Mix the Creamy Cheesecake Filling: In a mixing bowl, combine softened cream cheese, Greek yogurt, protein powder, honey or maple syrup, and vanilla extract. Whisk until smooth and well blended, ensuring there are no lumps.
- Assemble the Jars: Layer the cheesecake mixture over the base until the jar is about three-quarters full. For added texture, you can add a thin layer of fresh berries or fruit between the crust and the cheesecake layer.
- Chill and Set: Seal the jars and refrigerate for at least two hours to let the flavors meld and the filling firm up to a creamy yet stable consistency.
- Add Final Touches: Before enjoying, add a few fresh berries, nuts, or a drizzle of honey on top for an extra burst of flavor and visual appeal.
Notes
- Room Temperature Ingredients: Let your cream cheese and yogurt sit out before mixing to avoid lumps and ensure smooth blending.
- Choose the Right Protein Powder: Opt for unflavored or mildly flavored powders to not overpower the delicate cheesecake notes.
- Don’t Over-Sweeten: Remember, the base and toppings add flavor, so start with less sweetener and adjust as needed.
- Chill Time Matters: Refrigerate for at least two hours to allow the jars to firm and the flavors to harmonize fully.
- Layer Creatively: Try alternating layers of cheesecake and fruit for a beautiful visual and textural experience.
- Prep Time: 15 minutes
- Cook Time: 0 minutes
- Category: Appetizers
- Method: No-Bake
- Cuisine: American
Nutrition
- Serving Size: 1 jar (approx. 1 cup)
- Calories: 250-300 kcal
- Sugar: 8-10 g
- Sodium: 120-150 mg
- Fat: 10-12 g
- Saturated Fat: 6-7 g
- Unsaturated Fat: 3-4 g
- Trans Fat: 0 g
- Carbohydrates: 20-22 g
- Fiber: 1-2 g
- Protein: 15-20 g
- Cholesterol: 40-50 mg
Keywords: high protein snack, cheesecake jars, no-bake dessert, healthy dessert, portable snack, protein packed cheesecake, Greek yogurt dessert